
9 Easy Steps of carving Maxillary Central incisor from wax block

this is a complete guide on how to easily carve maxillary central incisor in just 9 steps including tips and tricks that elevates your carving to next level
carving of the maxillary central incisor is done primarily to better understand the morphology of the same and also it is important as the restoration in the aesthetic region requires the knowledge of tooth anatomy to better replicate it, thus replicate natural smile.
here are the 9 steps in which the carving of the maxillary central incisor is elaborated and also some tips and tricks are given in between to improve your carving.
STEP 1: take a wax block and mark the length of the crown at 10.5mm and root length at 13mm and A center Line at all four sides and give initial at base of the wax block to all sides eg. L= labial , P = palatal , M = mesial , D = distal
TIP: marking of the crown length at 11mm, It gives room for correction and also at the time of finishing, any irregularity can be smoothed without worry for dimension reduction
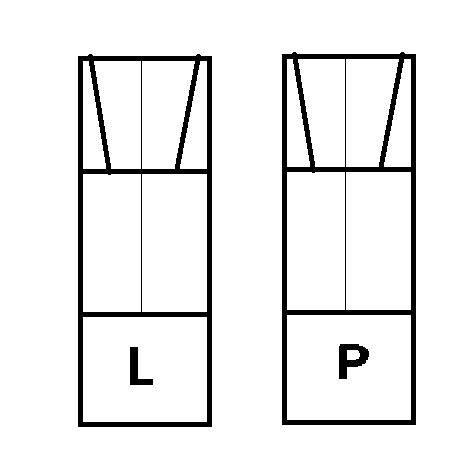
STEP 2: mark 3.5 mm on both sides of the central line if the labial and palatal side at cervical area (base of the crown) and 4.5 mm at the top. then connect those in line to make a shape like trapezoid.
REMOVE THE WAX OUTSIDE THE LINES.
TIP : A Mark at 4mm instead of 3.5mm & 5mm instead of 4.5mm , at the time of finishing reduce it to original size (7mm at base and 8.5mm at the top).
TIP : B Make palatal dimensions 0.5 to 1mm smaller, so that at time of carving palatal side it become easier to make prominent cingulum without carving much.
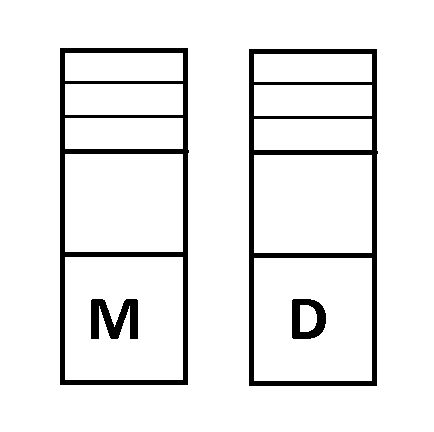
STEP 3 : At Mesial and Distal surface make two horizontal lines with equal distance in between so that it divides the surface in 3 equal parts
1 – Incisal Third (top) 2 – Middle Third (middle) 3 – cervical third (bottom)
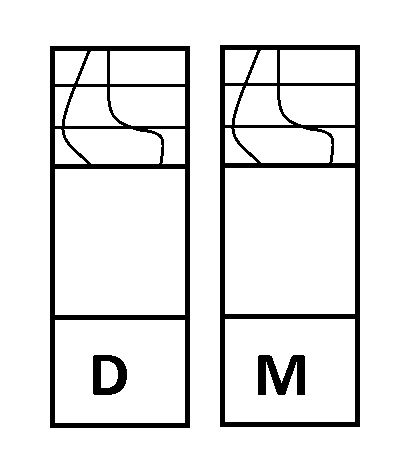
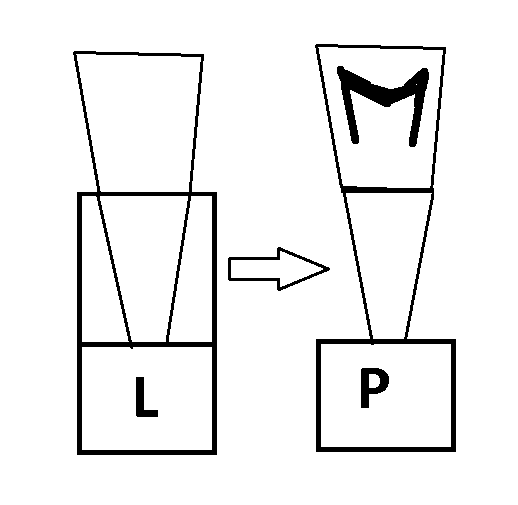
STEP 4 : On the labial side, make ‘c’ shape at cervical third and straight line connecting to the center of top. On the Palatal surface make ‘S’ shape that covers all three parts. this to be done on both the side.

STEP 5 : Remove the wax outside the lines on labial side first and then move on to palatal side
TIP : On the labial side carve it one by one from incisal to middle to cervical thirds and On the palatal side carve whole upper 2/3rd (incisal and middle third) then carve the cingulum at cervical third.
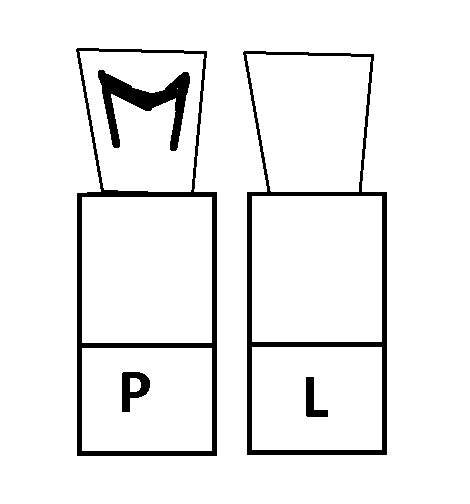
STEP 6 : carve ‘M’ shape in the palatal fossa region with back end of the carver (scoop like end) by scooping out in straight following the margin on both side.
TIP : scoop out from 1.5mm away from the margin, it creates more prominent DMR (Distal marginal ridge) and MMR (Mesial marginal ridge) and then scoop out 1.5mm below the incisal edge, it makes incisal edge more prominent and also gives little bit translucency to the edge.
STEP 7 : start with root carving by marking two lines from the cervical portion of the crown to the baseline of root portion on LABIAL side.
REMOVE THE WAX OUTSIDE THE LINES.
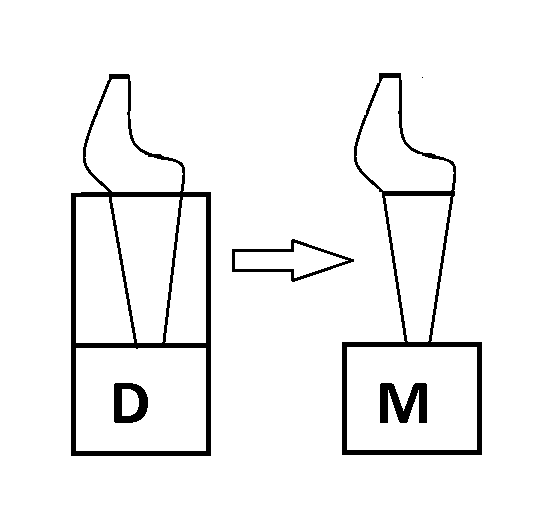
STEP 8 : mark two lines from the cervical portion of the crown to the baseline of root portion on MESIAL side.
REMOVE THE WAX OUTSIDE THE LINES.
TIP : make sure that you hold the wax block from the carved portion and not from the base because this is the most common mistake at this point people make and the root breaks from the base.
STEP 9 : round off everything of the root by giving straight strokes and rotating tooth clockwise to make it conical in shape and with help of green cloth do the finishing and then do polishing with microfiber cloth to get very smooth and polished surface. Also at this time round off the distal corner of incisal edge with green clothe to replicate tooth anatomy.
TIP : try to make the crown and root in single straight line without any curvatures
TIP : round off the palatal to mesial and to distal surface to get palatal constrictions properly and smooth transition from palatal to labial surface.

Textbook of Dental Anatomy
This book provides you with the basics of Dental anatomy and all other topics related to it. If you’re in 1st Year of BDS then It’s the Most recommended Book so far.
FOR VIDEO DEMONSTRATION CLICK ON THE LINK BELOW


thank you so much this was really helpfull.please do more blogs on carving
Mandibular central incisor carving in easy 9 steps sir
please post more carving steps about the other aspects of tooth, This one was pretty good thank you a bunch.